In this guide, we will look into how to create new profiles in the Google Chrome browser on PC or Mac.
Why Create New Profile in Chrome
The first reason is troubleshooting. Sometimes, Chrome doesn’t function the way it should and one of the popular troubleshooting steps involves creating a new Chrome profile and transferring all your data and files over. Another reason to create new profiles is to keep browsing and download history of kids and SO separate if you are using a single machine for surfing the web. You can also apply parental restrictions on these profiles in case you have kids in the house. You can create multiple profiles to separate your work and personal lives separate. So many users have accidentally shared NSFW content in the wrong chat window over the years. Do you install and use too many extensions? We have all been guilty of this at one point or another in our lives. Extensions are the primary reason why Chrome gets slow. You can create a dedicated profile for installing extensions. Just switch to this profile when you need to use all those extensions and keep a neat profile sans extensions when you are just browsing or watching YouTube videos, for example. You share switch to the guest user profile before giving control of your laptop to a friend or colleague. Keep your privacy in check. There are so many more reasons behind why you should consider creating Google Chrome profiles. They are easy to create and manage and even easier to switch to and from on the fly.
How to Create New Profile in Google Chrome
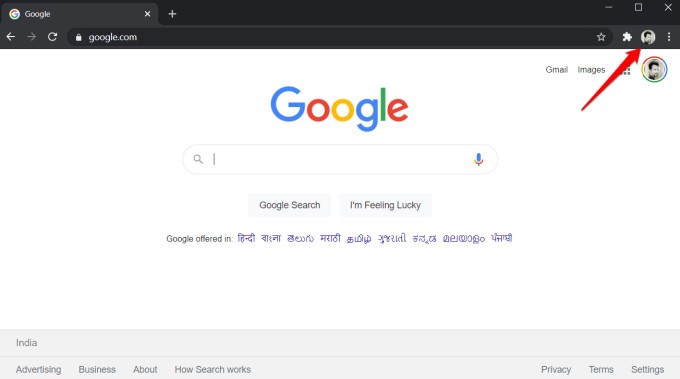
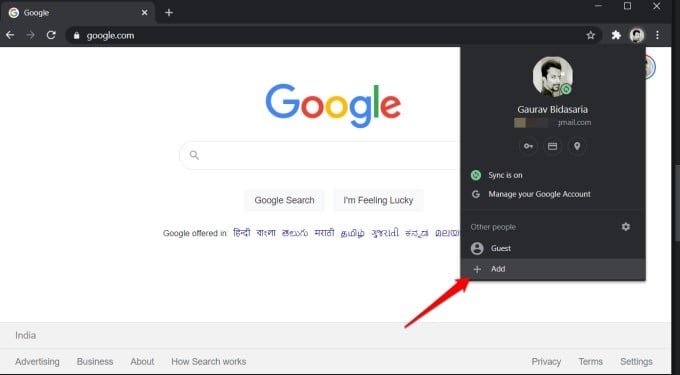
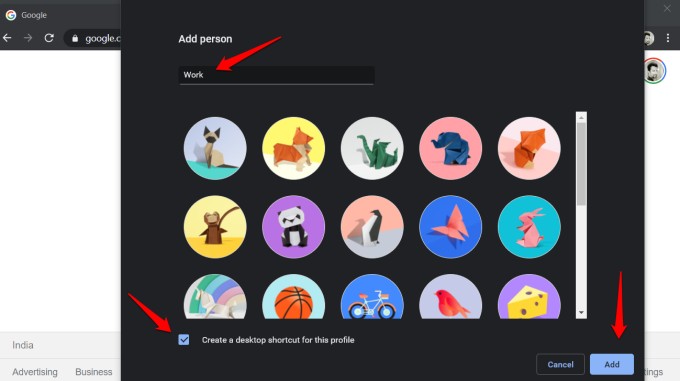
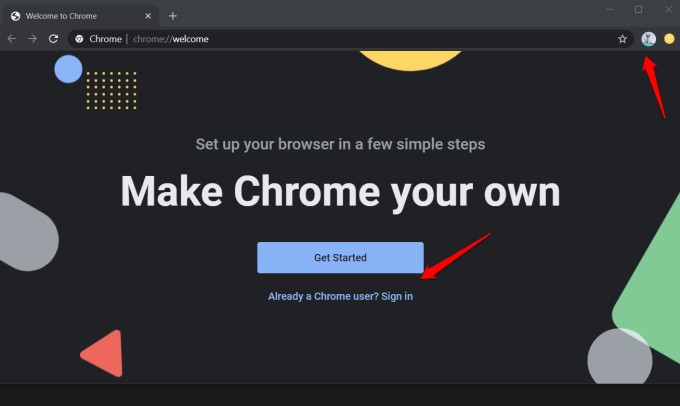
You can assign a photo to each profile in Google Chrome. This helps in identifying the profile that you are using currently easily. The profile photo should be visible in the top-right corner of the screen. Clicking on it once will reveal more details like email ID. To create a new Chrome profile, click on the current Google Chrome profile photo and select Add. Choose a name for your new profile and a profile photo from the given option. For now, there is no way to choose a custom photo. You may, however, choose to create a desktop shortcut for the newly created profile in case you are going to use it very often. Click on Add to continue. You will be met with a new window where you will be asked to set up your new Chrome profile. You can sign in with a different Google account if you have one or even create one. Otherwise, you can also use it in guest mode. To make sure that you are easily able to identify and switch between different profiles, each browser window will now display your profile photo in the Taskbar area. Click on the profile photo inside the Chrome window to manage profile-specific settings like sync, bookmarks, and more. You can now create multiple profiles in Google and set things up as per your needs.
How to Remove Google Chrome Profile
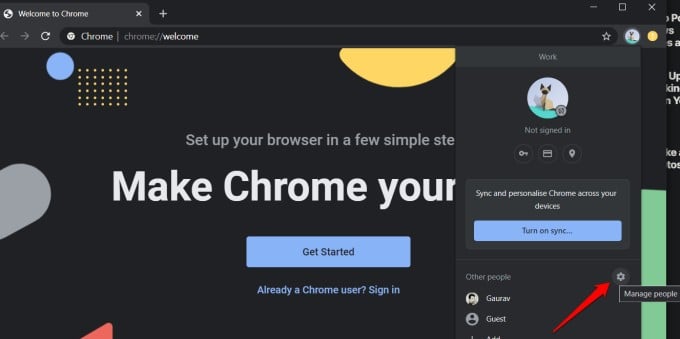
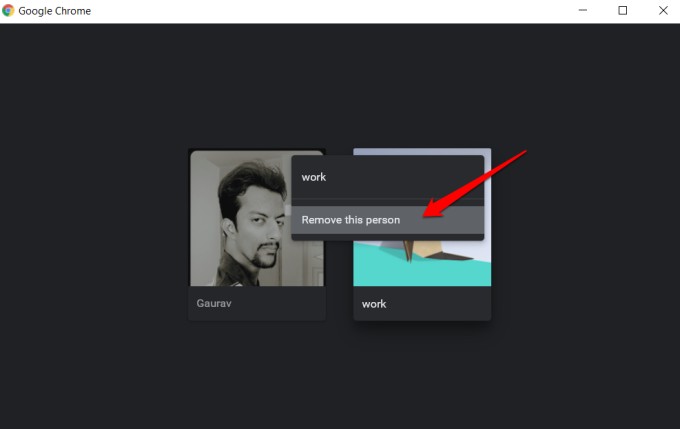
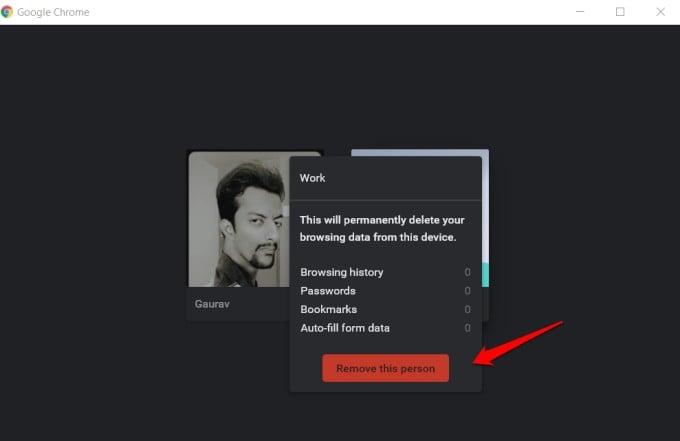
Removing or deleting Google Chrome profile will also delete all associated data like bookmarks, browsing history, cookies, saved passwords, and so on. Removing a profile is as easy as adding is. Click on the profile icon and select the gear icon next to the Other people heading where you will see active profiles listed. Click on the three-dot menu icon over the profile photo and then select Remove this person. Notice how Chrome says person and not profile. Nice touch. You will be met with a pop-up where Chrome will share details about the profile you are about to delete such as passwords, bookmarks, and other counts. Each profile has separate settings that you can change just like you would do in the main profile. Also Read: 10 Benefits of Using Chrome as Default Browser on iPhone
Wrap Up: Create Google Chrome Profile
There are a few things to keep in mind. The secondary profiles that you create in the Chrome browser are still tied to your primary Google account. You can enable the sync feature to sync data like bookmarks, browsing history, and passwords on other devices. There is also the option of adding a Google account or assigning a Gmail ID to the profile. Either way, your data will sync. Google Chrome adds a unique profile icon to each profile as we noted earlier but that may not be enough. In order to make the distinction more clear and pronounce, you can consider adding a unique wallpaper or theme to each browser. That way, when you launch the window or open a new tab, you will know which profile you are in. This will save you a lot of headache in the long run. Well, this is everything you need to know about creating and managing profiles on Chrome browser. Don’t forget to have fun with them.
Δ


